Hello world!!! first struts 2 project

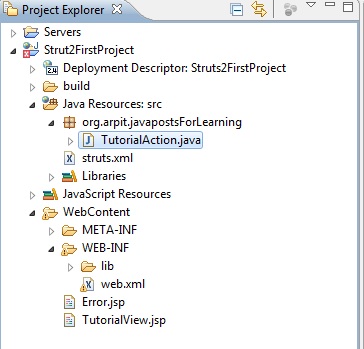
Here is the first struts strut2 application.

 so we will implement above modules in our project.

The web.xml file:

The web.xml configuration file is a J2EE configuration file that determines how elements of the HTTP request are processed by the servlet container. It is not strictly a Struts2 configuration file, but it is a file that needs to be configured for Struts2 to work.
As discussed earlier, this file provides an entry point for any web application. The entry point of Struts2 application will be a filter defined in deployment descriptor (web.xml). Hence we will define an entry of FilterDispatcher class in web.xml. The web.xml file needs to be created under the folder WebContent/WEB-INF.

copy following content in web.xml

<web-app id="WebApp_9" version="2.4" xmlns="http://java.sun.com/xml/ns/j2ee"
xmlns:xsi="http://www.w3.org/2001/XMLSchema-instance"
xsi:schemaLocation="http://java.sun.com/xml/ns/j2ee http://java.sun.com/xml/ns/j2ee/web-app_2_5.xsd">

Struts2FirstProject

struts2
org.apache.struts2.dispatcher.ng.filter.StrutsPrepareAndExecuteFilter


struts2
/*


default.jsp


Action Class:

We will have action class which is simple POJO class having attributes and method.
By default execute() method is called if we will execute any action.
Here we have TutorialAction.java as action class in our project.Create TutorialAction.java under
src

copy following content into TutorialAction.java
package org.arpit.javapostsForLearning;

public class TutorialAction {

public String execute()
{
String success="success";
return success;
}
}

JSP:

Create two jsp files named “TutorialView.jsp” and “Error.jsp” under WebContent.


copy following content into TutorialView.jsp
<%@ page language="java" contentType="text/html; charset=ISO-8859-1"
    pageEncoding="ISO-8859-1"%>


Insert title here


Hello world!!!This is Strut2 tutorial

copy following content into Error.jsp

<%@ page language="java" contentType="text/html; charset=ISO-8859-1"
    pageEncoding="ISO-8859-1"%>


Insert title here


Error!!!!

The struts.xml file:

 strut2.xml provides mapping between url to action mapping.
So if client enters “http://mywebapp/getTutorial&#8221; then Tutorial action will be called.
Create strut2.xml under src folder.
copy following content into struts2.xml

<!DOCTYPE struts PUBLIC
    "-//Apache Software Foundation//DTD Struts Configuration 2.0//EN"
    "http://struts.apache.org/dtds/struts-2.0.dtd">


            TutorialView.jsp
            Error.jsp
        
   
so request workflow is :
  1. Request(http://localhost:8080/Strut2FirstProject/getTutorial) is generated by user and sent to Servlet container.
  2. Servlet container invokes FilterDispatcher filter which in turn determines appropriate action.In this project,getTutorial action goes to TutorialAction class.
  3. In tutorialAction,execute() method is executed and returns “success”
  4. As per mapping in struts2.xml,result name is matched with returned string of execute().
  5. In this case,”success” is matched with result name=”success” in struts2.xml so accordingly,TutorialView.jsp is rendered and returned to user.

Now finally we will run our project.

right click on project->run as->run on server


so when you paste resultant url to your browser,you will get some thing like this.

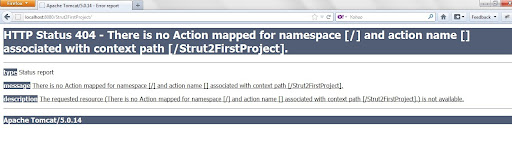
  We are getting this error because we have declared welcome file as “default.jsp” which do not exist.
  so if you paste “http://localhost:8080/Strut2FirstProject/getTutorial&#8221; you will get your output as
so as we included your action in url,It rendered “tutorialView.jsp” as output.


Introduction to Struts 2

Introduction to Struts 2

 Apache Struts 2 is an elegant, extensible framework for creating enterprise-ready Java web applications. The framework is designed to streamline the full development cycle, from building, to deploying, to maintaining applications over time.

Apache Struts2 was originally known as WebWork 2. After working independently for several years, the WebWork and Struts communities joined forces to create Struts2. This new version of Struts is simpler to use and closer to how Struts was always meant to be.
Struts 2 is a pull-MVC framework. i.e. the data that is to be displayed to user has to be pulled from the Action.

Struts2 supports annotation based configurations which are easy to create and more intuitive. Action class in Struts 2 act as the model in the web application. Unlike Struts, Struts 2 Action class are plain POJO objects thus simplifying the testing of the code. Struts2 also comes with power APIs to configure Interceptors that reduce greatly the coupling in application. The view part of Struts 2 is highly configurable and it supports different result-types such as Velocity, FreeMarker, JSP, etc

Architecture of struts 2

       In above diagrams There are 5 modules in Struts2

    1. Client-Client generates request which is processed by webContainer.Example of client can be web browser
    2. Interceptor-Interceptors can execute code before and after an Action is invoked. Most of the framework’s core functionality is implemented as Interceptors. Features like double-submit guards, type conversion, object population, validation, file upload, page preparation, and more, are all implemented with the help of Interceptors. Each and every Interceptor is pluggable, so you can decide exactly which features an Action needs to support.
    3. Strut2 xml– Struts2.xml acts as a router which invokes action class for client request.
    4. Action-Action module considered as a model class which invokes business service and function logic.
    5. JSP-It is view part.According to action,Corresponding JSP files is rendered and result is returned to user.

Request Processing Lifecycle

The request processing lifecycle of Struts2 framework is pretty much discussed in above section where we saw the architecture of Struts 2 framework.

  1. Request is generated by user and sent to Servlet container.
  2. Servlet container invokes FilterDispatcher filter which in turn determines appropriate action.
  3. One by one Intercetors are applied before calling the Action. Interceptors performs tasks such as Logging, Validation, File Upload, Double-submit guard etc.
  4. Action is executed and the Result is generated by Action.
  5. The output of Action is rendered in the view (JSP, Velocity, etc) and the result is returned to the user.

Configuring struts 2 in eclipse

First you need to download struts 2 framework from apache website .Click on “Download now” and Struts 2 will be downloaded on your machine.

Now Open your eclipse environment.

Click on Files->New->Other

Click on web->Dynamic web project

Write your project Name in the text box.I have written “Strut2FirstProject”
Now here,I am assuming you have apache tomcat server installed in your machine.If you 
have target runtime as none then you can refer this.
Now click on Finish button.
Right click on your project then click properties
Then click on Java Build Path

Click on add Library

choose user library and on next dialog box click on userLibraries

Click on new

give lib name you want to create.I have given it “Strut2” here

Now select to strut2 lib which you have created and click on add jars
go to location where you have download strut2 package and open lib
folder.you can have all jars but for now you can select following jars

  • struts2-core-2.3.1.2
  • xwork-core-2.3.1.2
  • ognl-3.0.4
  • commons-io-2.0.1
  • commons-fileupload-1.2.2
  • javassist-3.11.0.GA
  • freemarker-2.3.18
  • commons-lang-2.5
  • commons-logging-1.1.1
  • commons-logging-api-1.1

For having struts2 lib at deploy time,you need to again right click on project and
select properties and click on “Java EE module dependency”


 check Strut2 lib and click ok.
Now you are done with configuring strut2 in eclipse.You can create your strut2 project.

Decorator Design Pattern

Decorator Design Pattern

package com.javaletters.sample.designpattern;

public interface room{
public String showRoom();
}

The above is an interface depicting an room. I have kept things as simple as possible so that the focus will be on understanding the design pattern. Following class is a concrete implementation of this interface. This is the base class on which the decorators will be added.

package com.javaletters.sample.designpattern;

public class SimpleRoom implements Icecream {

@Override
public String showRoom() {
return "Normal Room";
}

}

Following class is the decorator class. It is the core of the decorator design pattern. It contains an attribute for the type of interface. Instance is assigned dynamically at the creation of decorator using its constructor. Once assigned that instance method will be invoked.

package com.javaletters.sample.designpattern;

abstract class RoomDecorator implements Room{

protected Room specialRoom;

public RoomDecorator (Room specialRoom) {
this.specialRoom= specialRoom;
}

public String showRoom() {
return specialRoom.showRoom();
}
}

Following two classes are similar. These are two decorators, concrete class implementing the abstract decorator. When the decorator is created the base instance is passed using the constructor and is assigned to the super class. In the showRoom method we call the base method followed by its own method addColors(). This addColors() extends the behavior by adding its own steps.

package com.javaletters.sample.designpattern;

public class ColorDecorator extends RoomDecorator {

public ColorDecorator (Room specialRoom) {
super(specialRoom);
}

public String showRoom() {
return specialRoom.showRoom() + addColors();
}

private String addNuts() {
return " + Blue Color";
}
}
package com.javaletters.sample.designpattern;

public class CurtainDecorator extends RoomDecorator {

public CurtainDecorator (Room specialRoom) {
super(specialRoom);
}

public String showRoom() {
return specialRoom.showRoom() + addCurtains();
}

private String addCurtain() {
return " + Red Curatains";
}
}

Execution of the decorator pattern

I have created a simple Room and decorated that with color and curatains. We can use as many decorators in any order we want. This excellent flexibility and changing the behaviour of an instance of our choice at runtime is the main advantage of the decorator design pattern.

package com.javaletters.sample.designpattern;

public class TestDecorator {

public static void main(String args[]) {
Room room = new CurtainDecorator(new ColorDecorator(new SimpleRoom()));
System.out.println(room.showRoom());
}

}

Output

Normal room + Blue Color + Red Curtains

Decorator Design Pattern in java API

java.io.BufferedReader; java.io.FileReader; java.io.Reader; The above readers of java API are designed using decorator design pattern.

Decorator Design Pattern

Decorator Design Pattern

package com.javaletters.sample.designpattern;

public interface Icecream {
  public String makeIcecream();
}

The above is an interface depicting an icecream. I have kept things as simple as possible so that the focus will be on understanding the design pattern. Following class is a concrete implementation of this interface. This is the base class on which the decorators will be added.

package com.javaletters.sample.designpattern;

public class SimpleIcecream implements Icecream {

  @Override
  public String makeIcecream() {
    return "Base Icecream";
  }

}

Following class is the decorator class. It is the core of the decorator design pattern. It contains an attribute for the type of interface. Instance is assigned dynamically at the creation of decorator using its constructor. Once assigned that instance method will be invoked.

package com.javaletters.sample.designpattern;

abstract class IcecreamDecorator implements Icecream {

  protected Icecream specialIcecream;

  public IcecreamDecorator(Icecream specialIcecream) {
    this.specialIcecream = specialIcecream;
  }

  public String makeIcecream() {
    return specialIcecream.makeIcecream();
  }
}

Following two classes are similar. These are two decorators, concrete class implementing the abstract decorator. When the decorator is created the base instance is passed using the constructor and is assigned to the super class. In the makeIcecream method we call the base method followed by its own method addNuts(). This addNuts() extends the behavior by adding its own steps.

package com.javaletters.sample.designpattern;

public class NuttyDecorator extends IcecreamDecorator {

  public NuttyDecorator(Icecream specialIcecream) {
    super(specialIcecream);
  }

  public String makeIcecream() {
    return specialIcecream.makeIcecream() + addNuts();
  }

  private String addNuts() {
    return " + cruncy nuts";
  }
}
package com.javaletters.sample.designpattern;

public class HoneyDecorator extends IcecreamDecorator {

  public HoneyDecorator(Icecream specialIcecream) {
    super(specialIcecream);
  }

  public String makeIcecream() {
    return specialIcecream.makeIcecream() + addHoney();
  }

  private String addHoney() {
    return " + sweet honey";
  }
}

Execution of the decorator pattern

I have created a simple icecream and decorated that with nuts and on top of it with honey. We can use as many decorators in any order we want. This excellent flexibility and changing the behaviour of an instance of our choice at runtime is the main advantage of the decorator design pattern.

package com.javaletters.sample.designpattern;

public class TestDecorator {

  public static void main(String args[]) {
    Icecream icecream = new HoneyDecorator(new NuttyDecorator(new SimpleIcecream()));
    System.out.println(icecream.makeIcecream());
  }

}

Output

Base Icecream + cruncy nuts + sweet honey

Decorator Design Pattern in java API

java.io.BufferedReader;

java.io.FileReader;

java.io.Reader;

The above readers of java API are designed using decorator design pattern.